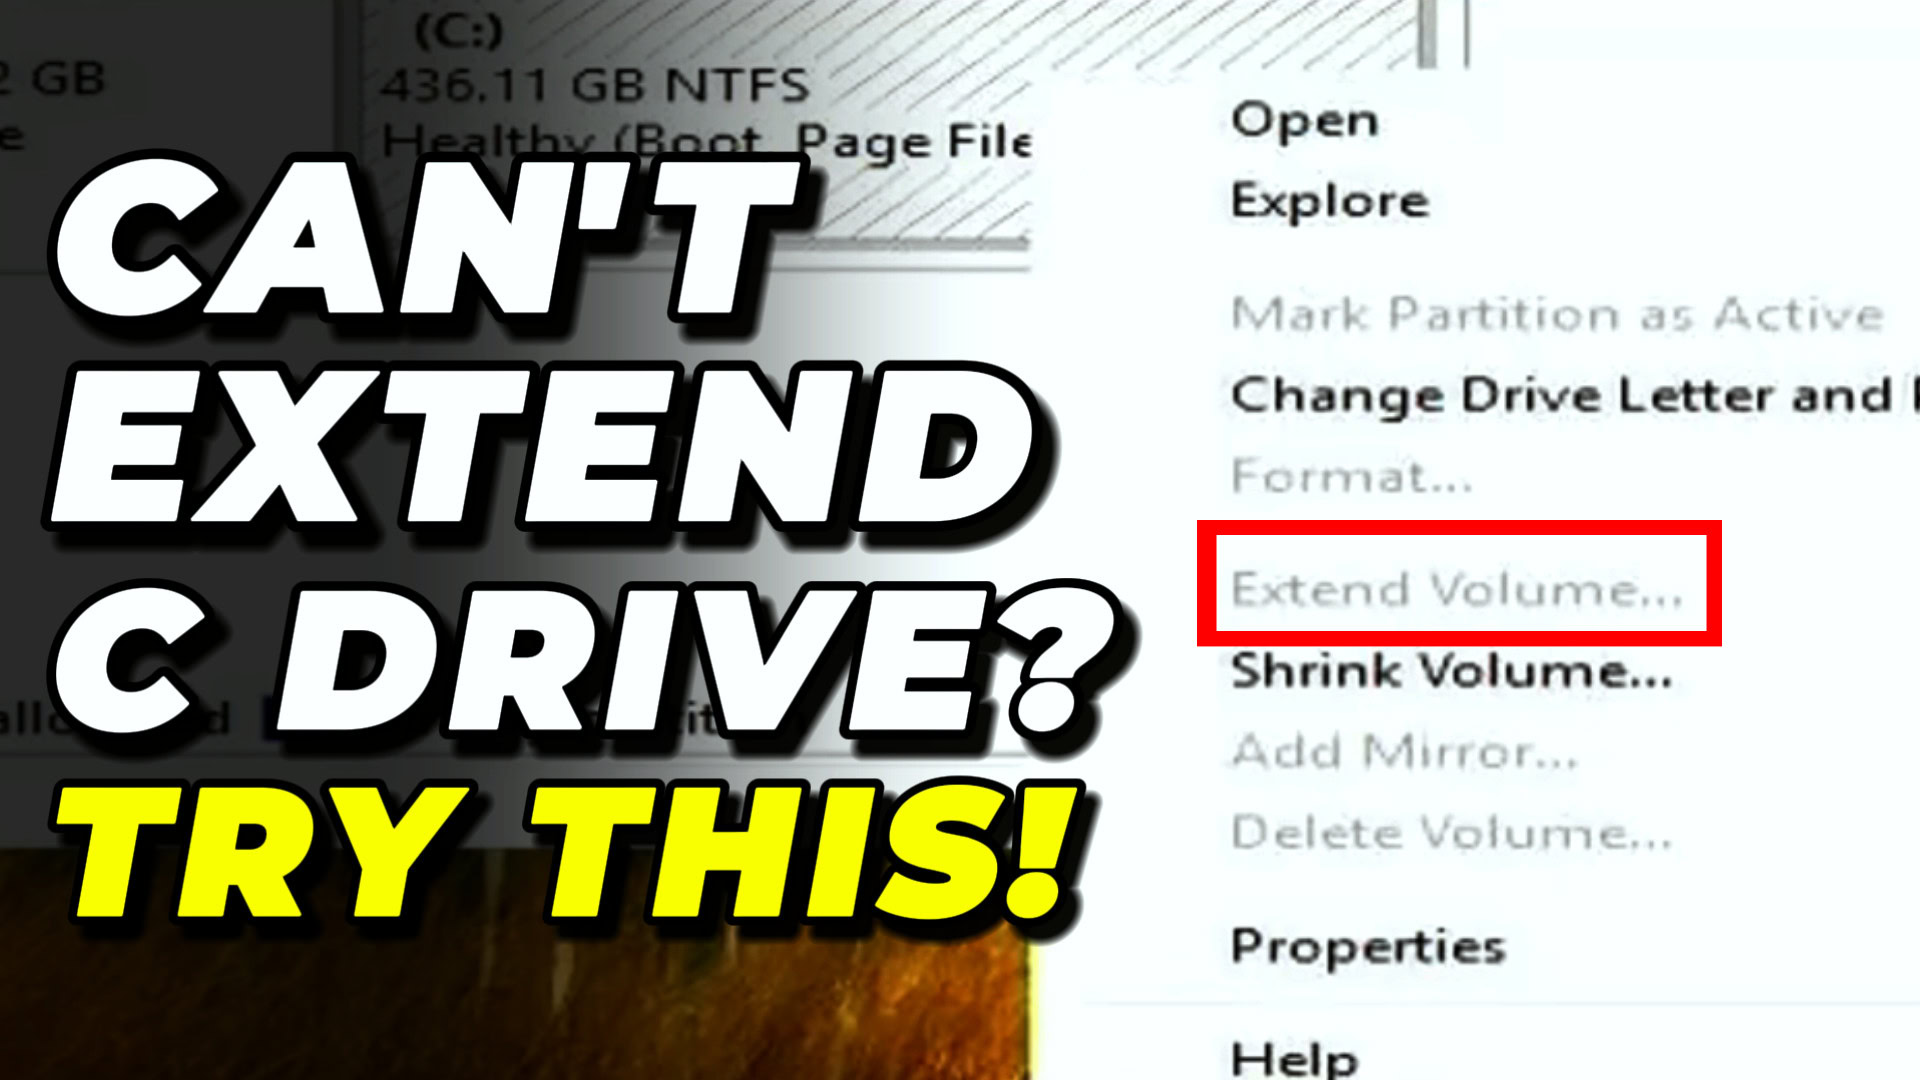
If the Extend Volume option is greyed out on your C drive in Windows 10 or Windows 11, a recovery partition is sitting between your C drive and the unallocated space and blocking the extension. The fix is to disable the recovery environment with reagentc /disable, delete the recovery partition with diskpart, extend the C drive, then recreate and re-register the recovery partition with reagentc /enable.
Applies to: Windows 10 (22H2) and Windows 11 (23H2, 24H2, 25H2) | Last updated: April 30, 2026
Key Takeaways
- Extend Volume is greyed out when a recovery or boot partition sits between the C drive and the unallocated space — Windows can only extend into space that is contiguous and immediately to the right of the partition.
- Disk Management cannot move partitions, so the recovery partition has to be deleted with
diskpart‘sdelete partition overridecommand, then recreated after the C drive is extended. - Save the original recovery partition’s Type ID and GPT Attributes before deleting it — you need both values to recreate a working recovery partition.
- The boot/EFI partition cannot be moved with built-in tools, so a few hundred megabytes of unallocated space may remain unreachable; a third-party partition manager like AOMEI Partition Assistant can shift it if you need every byte.
- Always run
reagentc /enableat the end to register the new recovery partition — without it, Windows recovery features (reset, advanced startup) will not work.
Quick Steps
- Open Command Prompt as administrator and run
reagentc /disable. - Launch
diskpart, select your disk (list disk→select disk 0), then list partitions and select the recovery partition. - Run
detail partitionand copy the Type ID and Attributes into Notepad. - Run
delete partition overrideto remove the recovery partition. - Right-click your C drive in Disk Management and choose Extend Volume to claim the freed space.
- Shrink 1 GB back off the C drive, create a new simple volume, and apply the saved Type ID and Attributes.
- Remove the auto-assigned drive letter, exit diskpart, and run
reagentc /enable.
Why Is Extend Volume Greyed Out?
Disk Management can only extend a volume into unallocated space that sits immediately to the right of it on the same physical disk. If anything is in between — a recovery partition, an EFI/boot partition, or a leftover Windows installer partition — the option is greyed out, even when there is plenty of free space further along the disk.
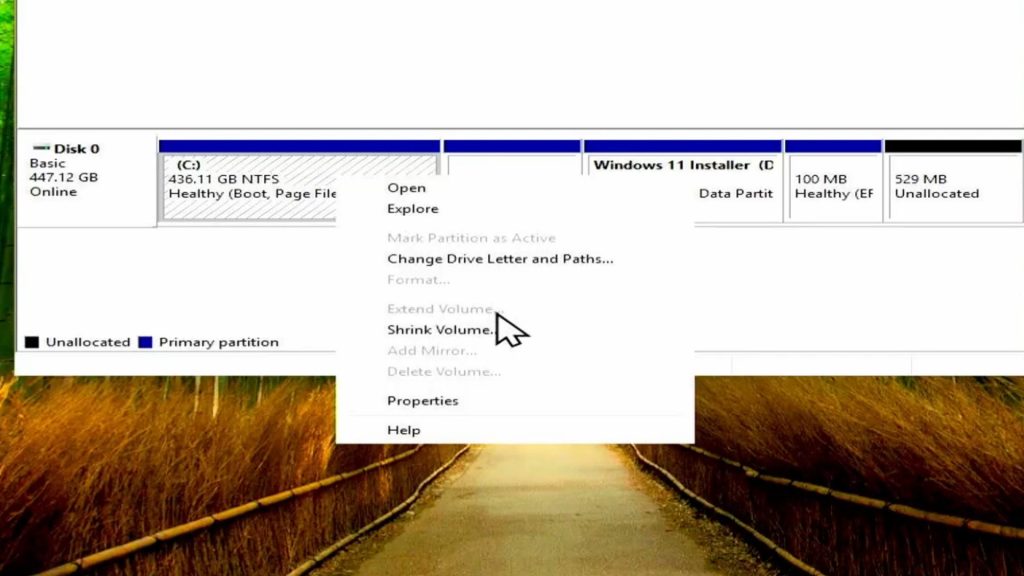
I ran into this myself while making my Install Windows 11 without a USB drive guide — the installer left a partition behind, and the recovery partition sitting between my C drive and that unallocated space made the Extend Volume option unavailable. Disk Management has no built-in way to move partitions, which is why we have to delete and recreate the recovery partition manually.
Warning: This procedure touches system partitions. One wrong selection in
diskpartcan leave your PC unbootable. Back up important files first, and if you are not comfortable with command-line work, use a third-party partition manager (covered later) instead.
Before You Start
- Administrator account on Windows 10 22H2 or Windows 11 (any build).
- At least 1 GB of unallocated space sitting after the recovery partition.
- A current backup of important data — diskpart will not warn you twice.
- Notepad open and ready to paste the recovery partition details.
Step 1: Delete Any Leftover Installer Partition
If you followed my Windows-without-USB guide, there will be a Windows installer partition on the same disk. Right-click it in Disk Management and choose Delete Volume — it is just a temporary holding area and is safe to remove. The space becomes part of the unallocated block.
Step 2: Disable the Recovery Environment
Open Start, type cmd, and run Command Prompt as administrator. Disable Windows RE before touching the recovery partition:
reagentc /disableYou should see “Operation Successful”. This unbinds the running OS from the partition so deleting it will not break the recovery configuration.
Step 3: Capture the Recovery Partition Details
Stay in the same Command Prompt window. Launch diskpart and select the disk that contains your Windows installation:
diskpart
list disk
select disk 0
list partition
Find the Recovery partition (usually 500 MB to 1 GB and labelled Recovery), select it, then ask for its details:
select partition 2
detail partition
Replace 2 with the actual partition number from the list. The output shows a Type GUID and an Attributes hex value — copy both into Notepad. You will need them at the end to recreate a working recovery partition.
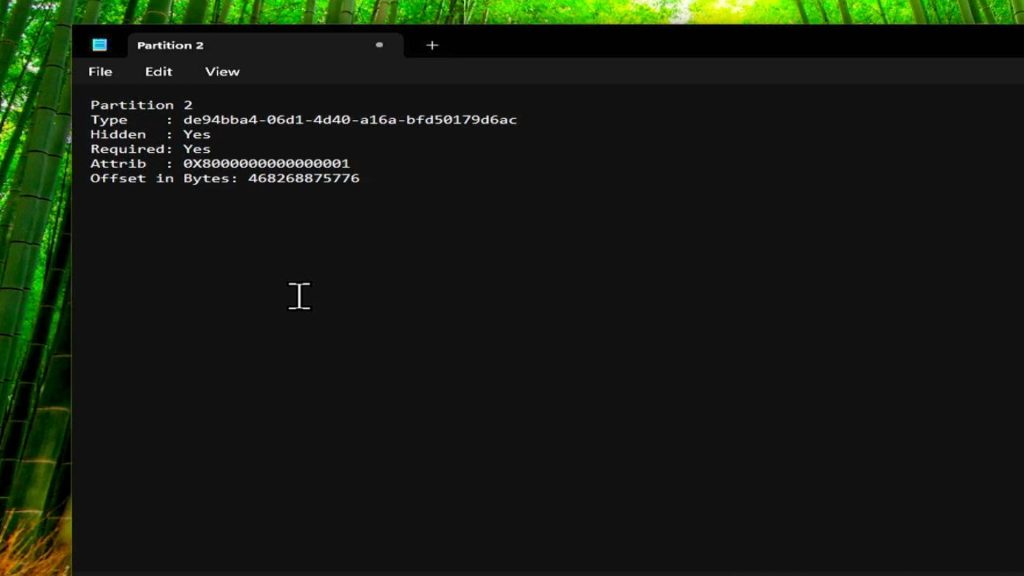
Step 4: Delete the Recovery Partition
With the recovery partition still selected, delete it. The override flag is required because Windows otherwise refuses to delete system partitions:
delete partition overrideDiskpart confirms with “DiskPart successfully deleted the selected partition.” If you have an EFI/boot partition between the C drive and the freed space, it will stay in place — that is normal and you cannot remove it with built-in tools.
Step 5: Extend the C Drive
Switch back to Disk Management. Press F5 to refresh, right-click the C drive, and choose Extend Volume. Walk through the wizard, accept the maximum available space (or set a custom amount), and finish. The C drive now occupies the freed-up space.
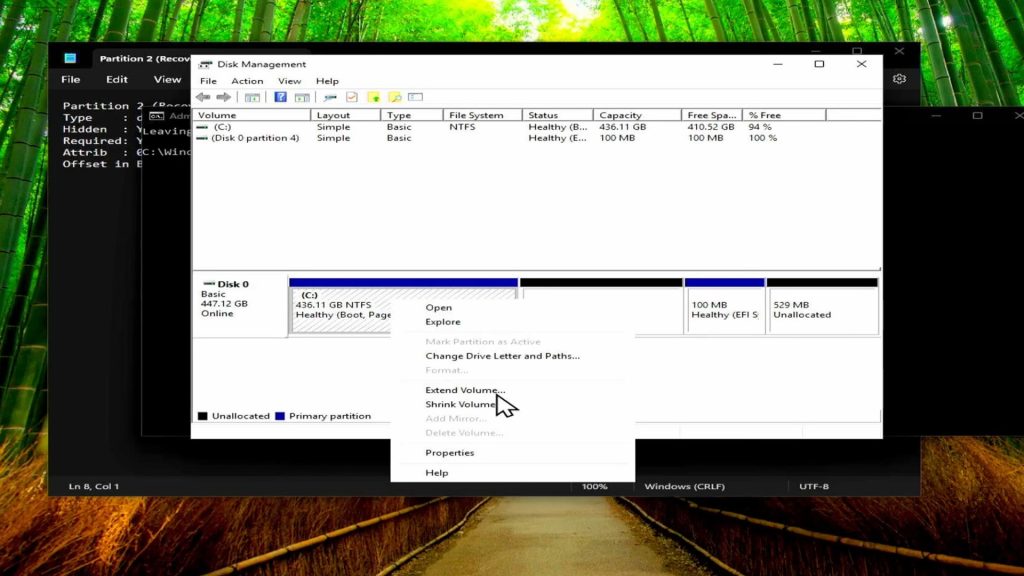
Step 6: Recreate the Recovery Partition
Right-click the C drive again and choose Shrink Volume. Enter 1000 MB (1 GB) and click Shrink — that gives you exactly enough room for a new recovery partition. Right-click the new unallocated block and pick New Simple Volume, click Next through every screen, and finish with default settings.
Back in Command Prompt, return to diskpart and select the new 1 GB partition:
diskpart
list disk
select disk 0
list partition
select partition 2
Use the partition number that matches the new volume. Now apply the saved Type ID and GPT attributes from Notepad — substitute the actual values you copied earlier:
set id=de94bba4-06d1-4d40-a16a-bfd50179d6ac
gpt attributes=0x8000000000000001
Tip: The values above are the standard Windows recovery partition Type ID and required hidden/system attributes — they will work in most cases, but always prefer the exact strings you captured from your own system in Step 3.
Step 7: Remove the Drive Letter and Re-enable Recovery
Setting the partition type does not remove the drive letter Disk Management auto-assigned. List volumes, find the new “New Volume” entry, select it, and remove the letter:
list volume
select volume 1
remove letter=D
Replace 1 with the actual volume number and D with the actual drive letter. Exit diskpart and re-register the recovery environment:
exit
reagentc /enable
“Operation Successful” confirms Windows RE is bound to the new partition and Reset, Advanced Startup, and the recovery menu work again.
When Some Space Stays Stranded
If your EFI partition sits between the C drive and the unallocated space, a few hundred megabytes will remain unreachable after this procedure — in my own setup, 529 MB stayed stranded next to the boot partition. Do not try to delete the EFI partition; doing so will prevent Windows from booting.
If you need every byte, a tool like AOMEI Partition Assistant can move the EFI partition without breaking the boot configuration. For most users, leaving 500 MB stranded is a reasonable trade-off compared to the risk of moving boot files.
Alternative: Skip Diskpart Entirely
If the diskpart route looks too risky, two safer paths get you the same result:
- Third-party partition manager. AOMEI Partition Assistant or MiniTool Partition Wizard can resize and move system partitions inside Windows with no command-line work. Both have free editions that handle this scenario.
- Clean install with proper partitioning. If you are due for a fresh start anyway, a clean Windows 11 install with WimUtil sets up partitions correctly from the beginning. Pair it with my Winhance utility afterward to debloat and configure the new install.
Troubleshooting
Extend Volume is still greyed out after deleting the recovery partition
Another partition is still in the way — usually the EFI/boot partition or a hidden OEM recovery partition. Press F5 in Disk Management to refresh, then look at the partition layout. The C drive can only extend into space that touches its right edge with no other partition between them.
reagentc /enable returns an error
Verify the new partition has the correct Type ID and GPT Attributes from your Notepad capture, that it is at least 500 MB, and that the C drive contains winre.wim at C:\Windows\System32\Recovery. If winre.wim is missing, copy it from install.wim on your Windows ISO before retrying.
The recovery partition keeps showing a drive letter
Run diskpart, select the volume, and run remove letter=X again. If it returns after a reboot, set the GPT Attributes value to 0x8000000000000001 (hidden + required) — Windows respects that flag and stops auto-assigning a letter.
Frequently Asked Questions
Will I lose data when I delete the recovery partition?
No — the recovery partition only contains winre.wim and the recovery environment files. Your personal files live on the C drive and are untouched. The recreated recovery partition restores full Windows recovery functionality.
Does this work on Windows 10 too?
Yes. The diskpart commands and reagentc switches are identical on Windows 10 22H2 and every supported Windows 11 build. The only difference you might see is the Type ID GUID, which is why Step 3 captures the values from your own system rather than hard-coding them.
Can I delete the EFI/boot partition for more space?
No. The EFI partition holds the boot loader and removing it makes Windows unbootable. Either accept the small amount of stranded space, or use a third-party partition manager that can move the EFI partition safely.
What if reagentc /enable cannot find a recovery partition?
Windows looks for a partition with the correct Type ID and the hidden/required attributes. If reagentc /enable cannot find one, the new partition’s Type ID or Attributes are wrong — go back into diskpart and reapply the values you captured in Step 3.
Is there a faster way next time?
Use a third-party partition manager like AOMEI Partition Assistant from the start — it can move and resize the recovery partition in one step without disabling Windows RE. The diskpart method is only worth using when you want to stay with built-in Windows tools.