It’s no secret that Microsoft wants us to sign in with a Microsoft account on Windows. They’ve made it increasingly difficult with recent Windows 11 versions to bypass the forced Microsoft account creation during setup. With Windows 11 25H2 releasing later this year, I’ve seen claims online that we won’t be able to bypass this requirement anymore, at least on the Home edition. I wanted to test this myself and share what I found.
Key Takeaways
- Both traditional Microsoft account bypass methods still work on Windows 11 25H2 Home edition
- The Shift+F10 command prompt access hasn’t been blocked as some reports suggested
- The second method using “start ms-cxh:localonly” is easier and doesn’t require internet disconnection
Requirements
To bypass the Microsoft account requirement on Windows 11 25H2, you’ll need:
- A Windows 11 25H2 installation (Home or Pro edition)
- Access to the command prompt during setup (Shift+F10)
- Basic knowledge of Windows Registry editing (for Method 1)
- For Method 1: Ability to disconnect from internet temporarily
Why Bypass Microsoft Account Requirements on Windows 11 25H2?
Many users prefer local accounts for privacy reasons, offline usage, or when setting up new devices. When you buy a new laptop and unbox it, you don’t necessarily want to reinstall Windows from a USB drive. You just want to set it up with a local account using the pre-installed Windows. These bypass methods let you do exactly that without needing tools like Rufus or custom installation media.
Method 1: Registry Edit with Internet Disconnection
This first method requires you to modify the Windows Registry and disconnect from the internet before restarting your computer.
Step 1: Access Command Prompt During Setup
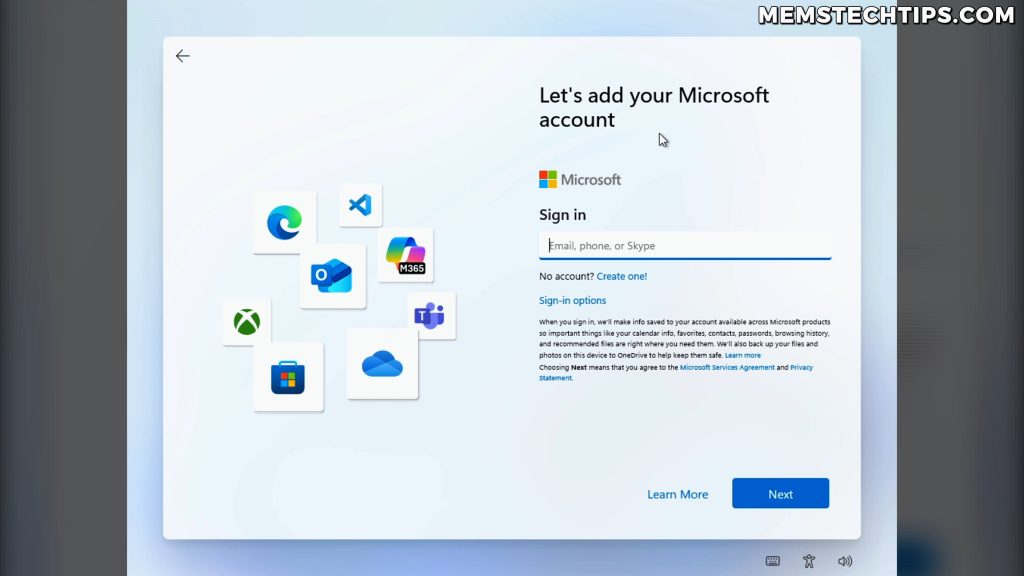
During the Windows 11 setup process, when you reach the Microsoft account sign-in screen:
- Press Shift + F10 (or Shift + Fn + F10 on laptops)
- The command prompt window should open successfully
- If you’re concerned about this not working, don’t worry – it still functions on Windows 11 25H2
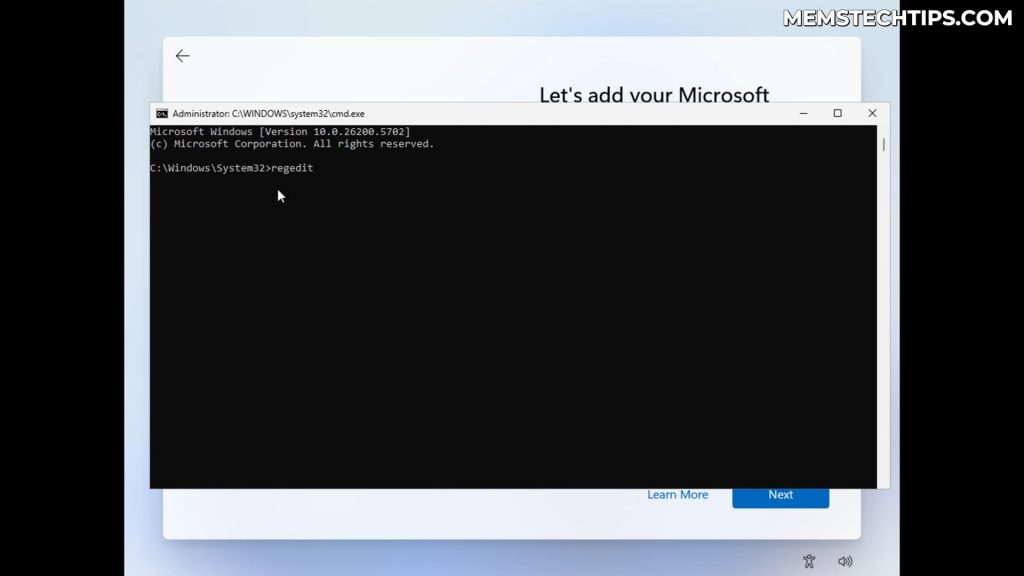
Note: Despite rumors suggesting Microsoft blocked this shortcut, Shift+F10 still works to open the command prompt during Windows 11 25H2 setup.
Step 2: Open Registry Editor
- In the command prompt, type
regeditand press Enter - The Windows Registry Editor will open
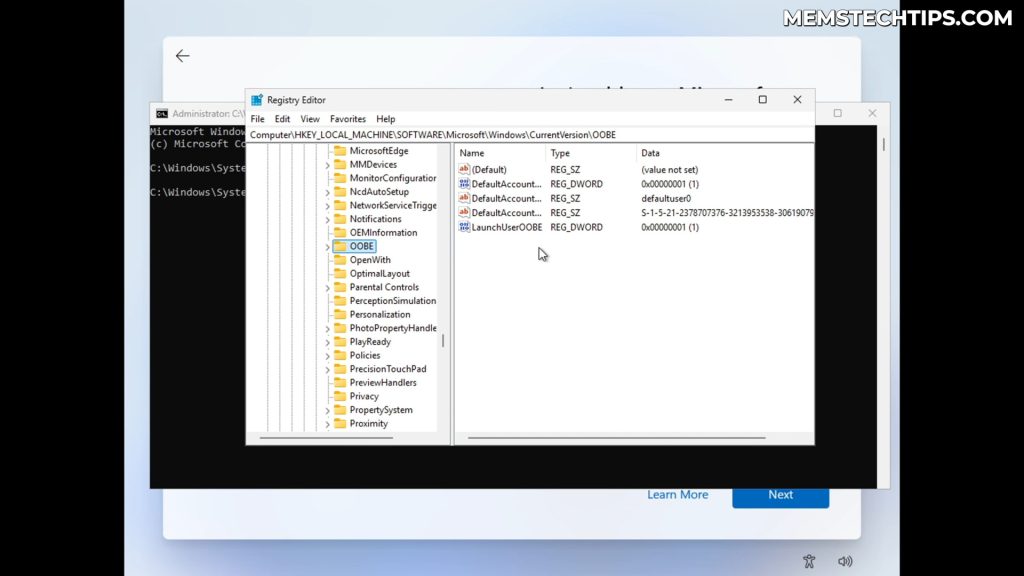
- Navigate to this path:
HKEY_LOCAL_MACHINE\SOFTWARE\Microsoft\Windows\CurrentVersion\OOBE
Step 3: Create the Bypass Registry Entry
- Right-click in the empty white space within the OOBE folder
- Select New → DWORD (32-bit) Value
- Name it
BypassNROand press Enter - Double-click the new entry to open it
- Change the Value data to
1 - Click OK to save the change

Important: This registry modification is exactly what Rufus uses when you select the option to remove Microsoft account requirements during USB creation.
Step 4: Disconnect from Internet and Restart
- Disconnect your computer from the internet completely:
- Unplug your ethernet cable, or
- Disconnect from Wi-Fi, or
- Enable airplane mode on laptops, or
- Turn off Wi-Fi entirely
- In the command prompt, type:
shutdown /r /t 1 - Press Enter to restart the computer immediately

Step 5: Complete Setup with Local Account
After the restart:
- Go through the initial setup screens again
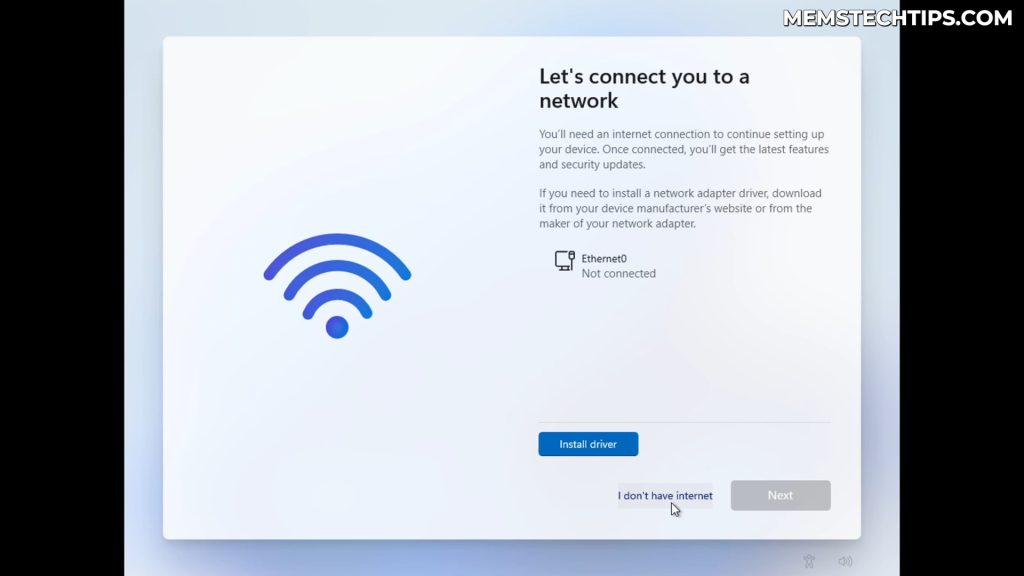
- When you reach the network connection screen, you’ll see “I don’t have internet” option
- Click I don’t have internet
- Choose Continue with limited setup
- Enter your desired username and password (password can be left blank)
- Complete the privacy settings as desired
You’ll now have a local account on Windows 11 25H2!
Method 2: Direct Local Account Creation (Recommended)
This second method is much easier and doesn’t require disconnecting from the internet or restarting your computer.
Step 1: Access Command Prompt
- During the Microsoft account sign-in screen, press Shift + F10
- Verify the command prompt opens (it should work fine on Windows 11 25H2)
- You can remain connected to the internet for this method
Step 2: Execute the Local Account Command
- Type this command exactly:
start ms-cxh:localonly - Press Enter to execute the command
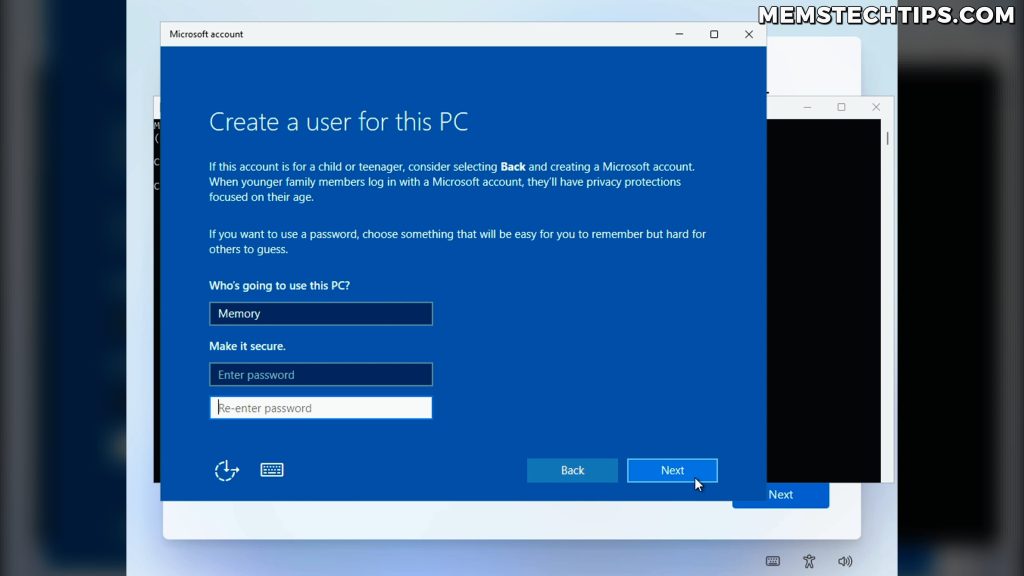
- A new window will open titled “Create a user for this PC”
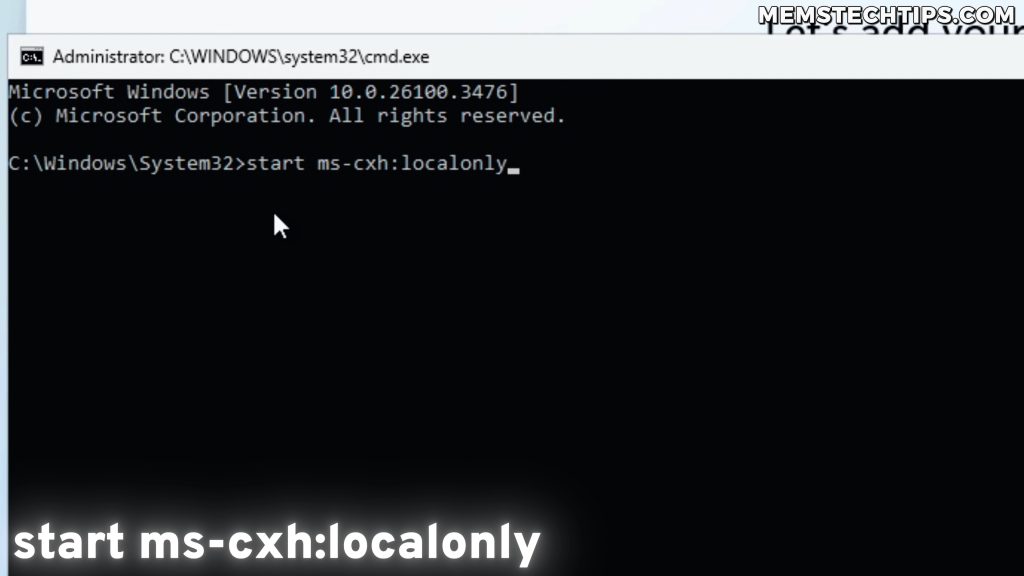
Tip: Even though the window mentions “Microsoft account,” this command creates a local account, not a Microsoft account.
Step 3: Create Your Local Account
- Enter your desired username (e.g., “Memory”)
- Enter a password if desired (you can leave this blank)
- Click Next to continue
- The system will skip most of the typical setup screens
- You’ll only see the privacy settings screen (Microsoft requires this)
- Adjust privacy settings as desired and complete setup
Verify Your Local Account
After setup completes:
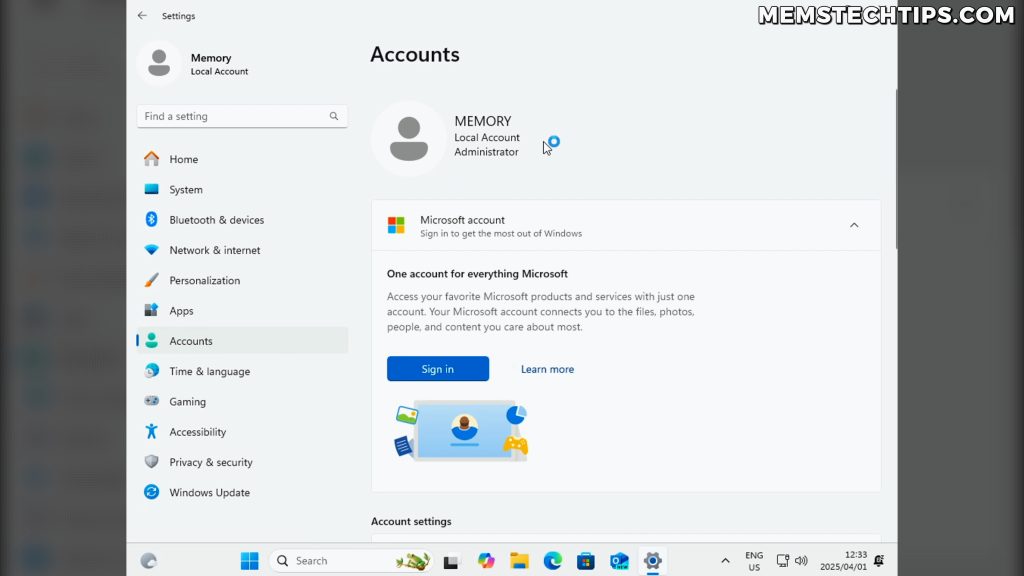
- Open Settings
- Navigate to Accounts
- Confirm you see “Local account” instead of a Microsoft account
- Go to System → About to verify you’re running Windows 11 25H2
Why These Methods Still Work
Both bypass methods continue working on Windows 11 25H2 Home edition, which means they’ll definitely work on Pro edition too. The claims about Microsoft completely blocking local account creation appear to be exaggerated or based on incomplete testing.
Method Comparison
| Feature | Method 1 (Registry) | Method 2 (ms-cxh) |
|---|---|---|
| Internet connection | Must disconnect | Can stay connected |
| Computer restart | Required | Not required |
| Setup screens | Shows all screens | Skips most screens |
| Difficulty | Moderate | Easy |
| Reliability | High | High |
Best Practice: I recommend using Method 2 (ms-cxh:localonly) because it’s simpler, faster, and doesn’t require internet disconnection or system restart.
When These Methods Are Most Useful
These bypass techniques are particularly valuable when:
- Setting up a new laptop out of the box
- You don’t want to reinstall Windows from scratch
- You prefer local accounts for privacy or offline usage
- You’re setting up multiple computers and want consistent local accounts
- You want to avoid the complexity of creating custom installation media
Rather than using tools like Rufus to create modified installation media, you can use these methods on any Windows 11 25H2 system during the initial setup process.
Troubleshooting Common Issues
Command Prompt Won’t Open
If Shift+F10 doesn’t work:
- Try Shift+Fn+F10 on laptops
- Ensure you’re pressing the keys simultaneously
- Try multiple times if needed
Registry Method Not Working
If Method 1 fails:
- Double-check the registry path is correct
- Ensure BypassNRO value is set to 1
- Make sure you’re completely disconnected from internet
- Verify the computer restarted properly
ms-cxh Command Not Working
If Method 2 fails:
- Type the command exactly as shown:
start ms-cxh:localonly - Ensure there are no extra spaces or characters
- Try typing it slowly to avoid typos
Conclusion
Despite reports suggesting Microsoft completely blocked local account creation in Windows 11 25H2, both traditional bypass methods still work perfectly. The second method using start ms-cxh:localonly is particularly elegant because it’s fast, doesn’t require internet disconnection, and skips most setup screens.
These methods prove invaluable when setting up new devices where you want local accounts without the hassle of custom installation media. Whether you’re a privacy-conscious user or just prefer the simplicity of local accounts, you can still bypass the Microsoft account requirement on Windows 11 25H2.
For more detailed guides on Windows account management, check out my articles on the best Windows 11 Microsoft account bypass methods and local account vs Microsoft account benefits.
Frequently Asked Questions (FAQ)
Does the Microsoft account bypass still work on Windows 11 25H2?
Yes, both bypass methods I tested work perfectly on Windows 11 25H2 Home edition. The reports about Microsoft completely blocking these methods appear to be inaccurate based on my testing.
Which bypass method is better for Windows 11 25H2?
Method 2 using start ms-cxh:localonly is superior because it doesn’t require internet disconnection, computer restart, or registry editing. It’s faster and simpler while achieving the same result.
Will these methods work on Windows 11 25H2 Pro edition?
Absolutely. Since both methods work on the more restrictive Home edition, they’ll definitely work on Pro edition which typically has fewer restrictions for local account creation.
Can I use these methods after Windows 11 25H2 is fully installed?
No, these bypass methods only work during the initial Windows setup process. Once Windows is fully installed and you’ve signed in with a Microsoft account, you’ll need to convert your Microsoft account to a local account through Settings.
Is it safe to modify the Windows Registry during setup?
Yes, the registry modification in Method 1 is safe and commonly used. It’s the same technique that tools like Rufus use to bypass Microsoft account requirements. However, if you’re uncomfortable with registry editing, use Method 2 instead.

