Microsoft just dropped some news that got the entire tech community talking. They’re removing certain mechanisms for creating local accounts during Windows setup, and naturally, everyone’s wondering if this means the end of local accounts altogether. But here’s the truth: at the time of writing this, you can still create a Windows 11 local account during setup, even on the latest 25H2 26220.6772 build.
In this guide, I’ll walk you through exactly what Microsoft changed, what stopped working, and most importantly, the two methods that still work perfectly for bypassing the Microsoft account requirement during Windows installation. These methods work on Windows 11 Home, which is the version where creating local accounts has always been the trickiest.
Key Takeaways
- Microsoft removed the “ms-cxh:localonly” command in the Windows 11 25H2 26220.6772 Build, but local account creation is still possible through registry methods
- Two registry workarounds still work: the BypassNRO method (requires disconnecting from internet) and the HideOnlineAccountScreens method (works even with internet connected)
- As long as local accounts exist in Windows, there will always be ways to sign in with a local account during setup, though methods may evolve over time
Requirements
To follow along with this guide and create a Windows 11 local account during setup, you’ll need:
- A computer running Windows 11 (Home or Pro edition) during the OOBE (Out of Box Experience) setup
- Access to the command prompt during setup (using Shift + F10)
- Basic familiarity with Windows Registry Editor
- For Method 1: The ability to disable network adapters or disconnect from the internet
Why Create a Local Account Instead of Using Microsoft Account?
You might be wondering why anyone would want to skip the Microsoft account setup in the first place. Let me tell you from experience, there are several legitimate reasons.
First, if you work in IT and set up computers for home users or small businesses, you’ll often encounter people who don’t have a Microsoft account and don’t want to create one. Walking them through creating a Microsoft account, setting up two-factor authentication, and remembering yet another password can be a nightmare when you’re trying to efficiently set up multiple devices.
Second, many consumer laptops come with Windows 11 Home pre-installed. Unlike Windows 11 Pro, the Home edition doesn’t give you the option to join a domain during setup, which would allow you to create a local account. You’re stuck with the Microsoft account requirement unless you know these workarounds.
Third, you’ve already paid for a Windows license with that laptop. Formatting and reinstalling Windows 11 Pro just to get easier local account access means buying another license, which doesn’t make financial sense.
Finally, some users simply prefer the privacy and control that comes with a local account. Not everyone wants their operating system connected to a cloud account, and that’s a valid choice.
What Microsoft Changed in the Windows 11 25H2 26220.6772 Build

Microsoft recently announced changes being rolled out to the Dev channel for Windows 11. According to their blog post, they’re removing “known mechanisms” for creating local accounts during the Windows setup experience (also called OOBE).
Their official reasoning? They claim these mechanisms were being used to bypass Microsoft account setup, and that doing so inadvertently skips critical setup screens, potentially causing users to exit OOBE with a device that isn’t fully configured for use.
The Commands That No Longer Work
Let me be clear about what actually stopped working. There are two commands that tech-savvy users have relied on in the past:
OOBE/BypassNRO Command: This command actually stopped working way back in Windows 11 24H2. It’s been broken for a while now, so its removal in the new 25H2 Build isn’t really news.
ms-cxh:localonly Command: This is the big one. I created a guide just one month before posting this, showing how to use this command to create a local account on Windows 11 25H2. This command would give you a simple screen where you could enter a username and password, create a local account, and move on with your day. That’s what Microsoft specifically removed in this latest Dev Build update.
The removal of the localonly command is currently active on Windows 11 Insider Preview Build 26220.6772 in the Dev channel. If you try running it now, it just crashes the Windows setup experience and restarts the onboarding process.
Method 1: Create Windows 11 Local Account Using BypassNRO Registry Key
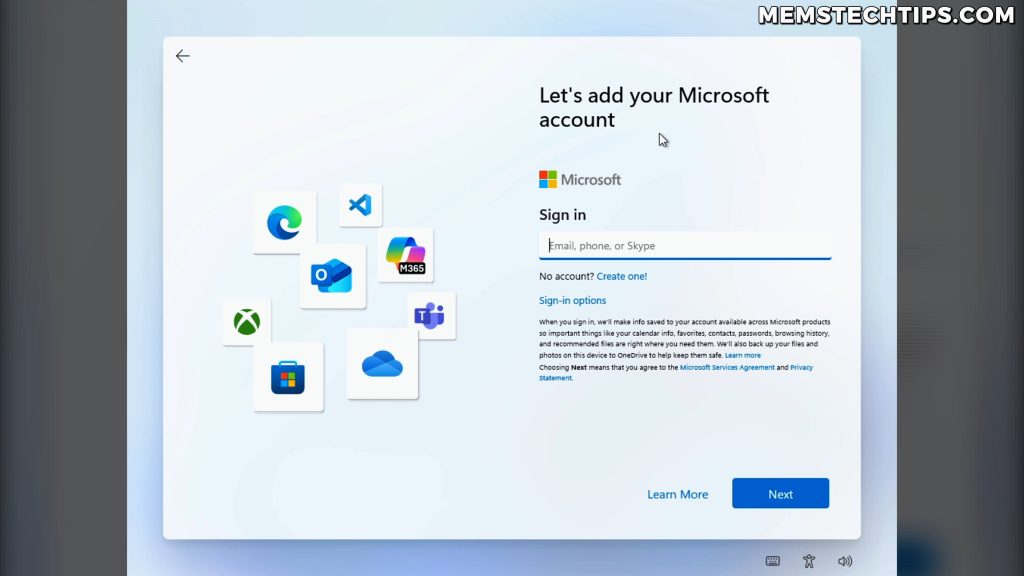
This first method is the registry equivalent of the old OOBE/BypassNRO command that stopped working. The key difference? This registry method still works perfectly on the latest 25H2 Dev Build.
Let me walk you through the entire process. For demonstration purposes, I’m going to assume you’ve already gone through the initial setup screens where you selected your region, language, and keyboard layout, and Windows checked for updates. You’re now at the “Unlock your Microsoft experience” screen.
Step 1: Open Command Prompt During Setup
Press Shift + F10 on your keyboard. If you’re on a laptop, you might need to press Shift + Fn + F10 instead. This keyboard shortcut opens the command prompt during Windows setup.
Note: If the command prompt doesn’t open, your Windows installation might be in S Mode (a security mode). At the time of writing, I don’t have a workaround for S Mode, but I’m actively researching this issue.
Step 2: Open Registry Editor
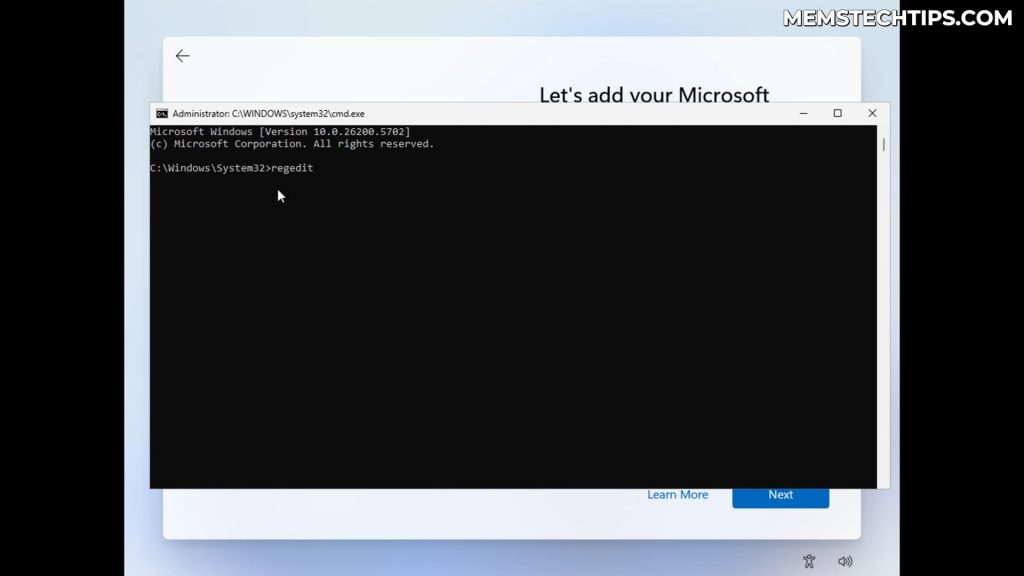
In the command prompt window that just opened, type:
regedit
Press Enter, and the Registry Editor will open. Go ahead and maximize this window so you can see everything clearly.
Step 3: Navigate to the OOBE Registry Key
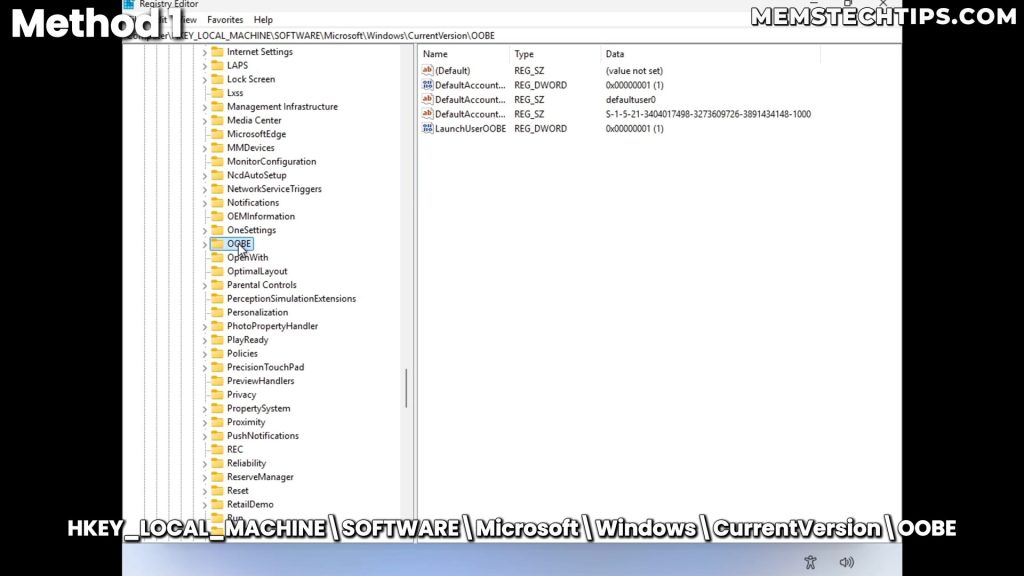
Now you need to navigate to a specific location in the registry. Follow this path:
HKEY_LOCAL_MACHINE\SOFTWARE\Microsoft\Windows\CurrentVersion\OOBE
Here’s how to get there step by step:
- Expand HKEY_LOCAL_MACHINE
- Expand SOFTWARE
- Expand Microsoft
- Scroll down and expand Windows
- Expand CurrentVersion
- Click on OOBE
Step 4: Create the BypassNRO Registry Value

Once you’re in the OOBE key, right-click on OOBE in the left panel, then:
- Select New
- Choose DWORD (32-bit) Value
- Name this new value exactly:
BypassNRO - Press Enter to create the key
Step 5: Set the Value to 1

Double-click on the BypassNRO value you just created. In the dialog box that appears:
- Change the Value data from 0 to 1
- Click OK
Important: This registry key is the same one that Rufus creates when you select the option to remove the Microsoft account requirement during Windows installation. If you’ve used Rufus before, this should look familiar.
Step 6: Disconnect from the Internet
Screenshot showing Device Manager being opened from Command Prompt

Creating the registry key alone isn’t enough. You also need to disconnect from the internet for this method to work. In my previous guides, I recommended unplugging your ethernet cable or turning off Wi-Fi, but I’ve found a much better method that works reliably on all devices, including laptops.
Go back to the command prompt window and type:
devmgmt
Press Enter. This opens Device Manager.
Step 7: Disable All Network Adapters

In Device Manager:
- Double-click on Network adapters to expand it
- You’ll see one or more network adapters listed (on a laptop, you’ll typically see both Wi-Fi and Ethernet adapters)
- Right-click on each network adapter
- Select Disable device
- Click Yes to confirm
- Repeat this for every network adapter in the list
This method of disconnecting from the internet is much more reliable than trying to use airplane mode or unplugging cables, especially on laptops where Wi-Fi can be tricky to fully disable.
Step 8: Complete the Local Account Setup

Now you can close Device Manager and close the command prompt. Click Back on the setup screen.
You should now see a screen asking “Who’s going to use this device?” This is where you create your Windows 11 local account:
- Enter your desired username
- Click Next
- Enter a password if you want one (you can leave it blank)
- Click Next
- Choose your privacy settings (I recommend unchecking options you don’t need)
- Click Accept
Windows will now continue with the onboarding experience and load into your newly created local account.
Step 9: Re-enable Network Adapters
Screenshot showing network adapters being re-enabled after setup

Once you’re logged into Windows with your local account, you need to restore your internet connection:
- Click the Start button and search for Device Manager
- Open Device Manager
- Expand Network adapters
- Right-click on each disabled network adapter
- Select Enable device
Your internet connection will now be restored, and you’ll be using Windows 11 with a local account instead of a Microsoft account.
Method 2: Create Windows 11 Local Account Using HideOnlineAccountScreens Registry Key
This second method might actually be even better than the first one because you don’t need to disconnect from the internet at all. The HideOnlineAccountScreens registry key completely hides the Microsoft account sign-in screens during setup.
Let me show you how this works.
Step 1: Open Command Prompt and Registry Editor

Just like in Method 1, press Shift + F10 (or Shift + Fn + F10 on laptops) to open the command prompt during the Windows setup experience.
Type regedit and press Enter to open the Registry Editor.
Step 2: Navigate to the OOBE Registry Key

Navigate to the same registry location as before:
HKEY_LOCAL_MACHINE\SOFTWARE\Microsoft\Windows\CurrentVersion\OOBE
Step 3: Create the HideOnlineAccountScreens Registry Value

This time, you’re going to create a different registry value:
- Right-click on OOBE in the left panel
- Select New
- Choose DWORD (32-bit) Value
- Name it exactly:
HideOnlineAccountScreens - Press Enter
Step 4: Set the Value to 1

Double-click on the HideOnlineAccountScreens value and:
- Change the Value data to 1
- Click OK
Step 5: Continue with Setup (While Connected to Internet)
Screenshot showing the setup continuing without Microsoft account screens

Now close the Registry Editor and close the command prompt. Here’s where this method really shines: you can continue with the normal setup process while still connected to the internet.
As you go through the setup, you’ll notice that Windows completely skips the Microsoft sign-in screens. It won’t even show you the “Unlock your Microsoft experience” page. Instead, you’ll go straight to the local account creation screen.
Tip: You can verify you’re still connected to the internet by opening command prompt (Shift + F10) and typing
ping 8.8.8.8to ping Google’s DNS. If you get replies, you’re connected, this is what I did when testing this method.
Step 6: Create Your Local Account

When you reach the account creation screen:
- Enter your username
- Enter a password (optional – you can leave it blank)
- Click Next
- Configure your privacy settings
- Click Accept
Windows will check for updates and then load into your local account. The best part? You never had to disconnect from the internet, making this method potentially more convenient than Method 1.
Understanding Which Method to Use
Both methods work perfectly on the Windows 11 25H2 Dev Build where Microsoft removed the localonly command. But which one should you use?
Use Method 1 (BypassNRO) if:
- You don’t mind temporarily disconnecting from the internet
- You want to use the same method that Rufus uses
- You prefer a method that’s been tested and documented extensively
Use Method 2 (HideOnlineAccountScreens) if:
- You want to stay connected to the internet throughout setup
- You’re working on a laptop where disabling network adapters might be inconvenient
- You want the most streamlined experience possible
In my testing, both methods work reliably on Windows 11 Home and Pro editions, on both physical hardware and virtual machines.
Alternative Method: Using an Unattend.xml Answer File
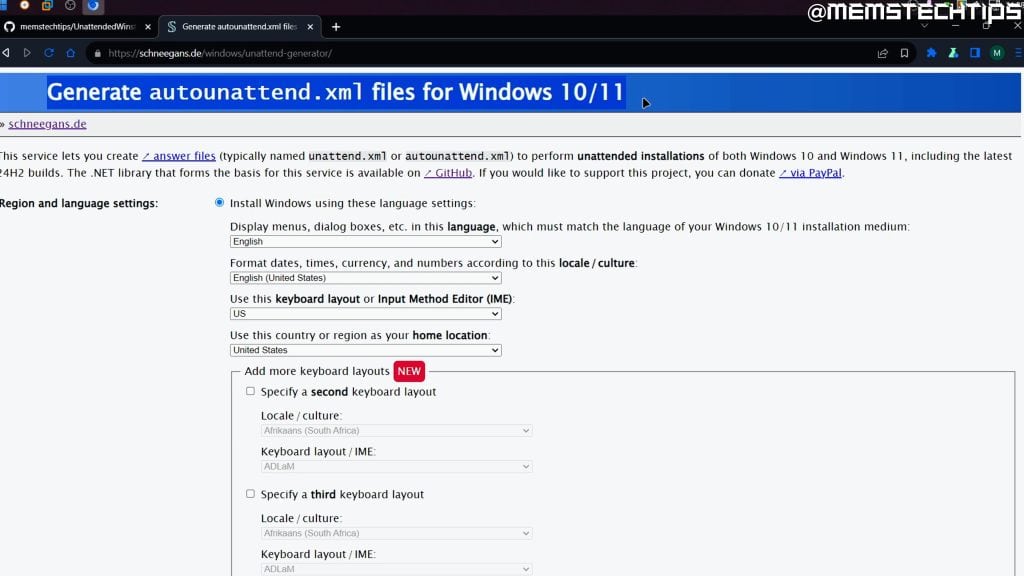
There’s another method worth mentioning, even though it requires more preparation: using an unattend.xml answer file. Tools like Schneegans Unattend Generator can create answer files that automatically configure Windows during installation, including creating local accounts.
When you use an answer file, Windows automatically creates the local account you specified and logs you in. You won’t even see the Windows setup screens. However, this method requires doing a clean install of Windows, which isn’t practical if you’re unboxing a new laptop that already has Windows installed.
That’s why the registry methods I showed you are so valuable. They work on brand-new devices without requiring a full Windows reinstallation.
Learn More: If you want to dive deeper into answer files, check out my comprehensive guide on how to create an unattended answer file for Windows 10 and 11.
Why These Methods Will Continue to Work
Here’s something important to understand: as long as local accounts exist in Windows, there will always be ways to sign in with a local account during setup.
Think about it from Microsoft’s perspective. There are computers running Windows that don’t have internet connections. Industrial systems, isolated networks, secure environments – these all require the ability to set up Windows without internet access. So how would Microsoft expect you to sign in with a Microsoft account if you don’t have internet?
That’s why I believe local accounts will remain in Windows for the foreseeable future. The process of creating them might become more complicated, and Microsoft might remove certain methods (like they did with the localonly command), but the fundamental capability needs to exist.
The registry methods I showed you work because they’re tapping into the same functionality that Windows needs for offline setups. Microsoft could theoretically remove these specific registry keys in a future update, but they’d need to maintain some mechanism for local account creation.
Troubleshooting Common Issues
Shift + F10 Doesn’t Open Command Prompt
If pressing Shift + F10 doesn’t open the command prompt, your device might be in Windows S Mode, which is a locked-down security mode. At the time of writing this guide, I haven’t found a workaround for S Mode during the initial setup. However, after setup is complete, you can switch out of S Mode and then convert from a Microsoft account to a local account.
Can’t Find Network Adapters in Device Manager
If you don’t see any network adapters in Device Manager during setup, Windows might not have loaded the network drivers yet. This actually works in your favor for Method 1, since being disconnected from the internet is exactly what you need.
Method Doesn’t Show Local Account Option
If you’ve created the registry key but still don’t see the option to create a local account, make sure you’re fully disconnected from the internet (for Method 1) or that you spelled the registry value name exactly right (for Method 2). The registry is case-sensitive, so HideOnlineAccountScreens and BypassNRO must be spelled exactly as shown.
Testing Details: What I Used

For this guide, I tested both methods on a virtual machine running:
- Windows Version: Windows 11 Home, Version 25H2
- Build Number: Insider Preview Build 26220.6772 (Dev Channel)
- Edition: Windows 11 Home (the most restrictive edition)
I specifically tested on Windows 11 Home because that’s where creating local accounts has always been the most challenging. If these methods work on Home edition, they’ll definitely work on Pro, Enterprise, and Education editions.
Important Considerations About Local Accounts vs. Microsoft Accounts
Before you decide to create a local account, it’s worth understanding what you’re gaining and what you might be losing.
Benefits of Local Accounts
- Complete privacy – your account isn’t connected to Microsoft’s cloud services
- No internet required for login
- Faster login times (no cloud authentication)
- Full control over your account without cloud synchronization
Benefits of Microsoft Accounts
- Automatic backup and sync of settings across devices
- Access to OneDrive cloud storage
- Seamless integration with Microsoft 365 apps
- Built-in device encryption on supported hardware
- Easier account recovery if you forget your password
The choice ultimately depends on your priorities. For many home users and IT professionals setting up devices for clients, a local account makes the most sense. For users who want cloud integration and cross-device syncing, a Microsoft account might be preferable.
Worth Reading: I’ve written an in-depth comparison of Windows local accounts vs. Microsoft accounts if you want to explore this topic further.
What Happens If Microsoft Removes These Registry Methods?
It’s entirely possible that Microsoft will eventually patch these registry methods too. They’ve shown they’re willing to remove workarounds, and these registry keys could be next.
But here’s what you need to remember: the community of Windows power users and IT professionals is incredibly resourceful. When one method gets blocked, another one emerges. This has been the pattern for years, and I don’t see it changing.
My commitment to you is that I’ll continue testing and documenting whatever methods work. If Microsoft removes these registry methods, I’ll update my guides with new working solutions. That’s why following my content on YouTube and my blog is valuable – you’ll always have access to the latest working methods.
Conclusion
Microsoft’s removal of the localonly command in the Windows 11 25H2 26220.6772 Build definitely makes creating local accounts less straightforward. But it’s far from impossible. The two registry methods I showed you – BypassNRO and HideOnlineAccountScreens – both work perfectly at the time of writing this guide.
Whether you’re an IT professional setting up devices for clients, a privacy-conscious user who prefers local accounts, or someone who simply doesn’t want a Microsoft account, these methods give you the freedom to set up Windows your way.
Remember, as long as local accounts exist in Windows – and they’ll need to exist for offline scenarios – there will always be ways to create them during setup. The methods might evolve, but the capability will remain.
Frequently Asked Questions (FAQ)
Does this work on Windows 11 Pro or just Home edition?
Both methods work on Windows 11 Home, Pro, Enterprise, and Education editions. I specifically tested on Home edition because that’s where creating local accounts is most restricted. Windows 11 Pro actually has an easier built-in method – you can select “Set up for work or school” during setup, then choose “Sign-in options” and select “Domain join instead,” which allows local account creation without any registry modifications.
Will Microsoft remove these registry methods in a future update?
It’s possible, yes. Microsoft has shown they’re willing to remove local account workarounds, as evidenced by blocking the localonly command. However, they need to maintain some mechanism for local account creation because many business and offline scenarios require it. If these methods do get blocked, new workarounds typically emerge from the Windows community. I’ll continue updating my guides with whatever methods work at the time.
Can I convert from a Microsoft account to a local account after setup is complete?
Absolutely! If you’ve already set up Windows with a Microsoft account, you can convert it to a local account later. Go to Settings > Accounts > Your info, and click “Sign in with a local account instead.” This gives you the option to disconnect your Microsoft account and create a local account without reinstalling Windows. Just make sure you know your current Microsoft account password before starting this process.
Is using these registry methods safe for my computer?
Yes, these methods are completely safe. You’re simply creating registry values that Windows recognizes and uses to modify the setup experience. The BypassNRO registry key is literally the same key that popular tools like Rufus create when you select the option to bypass Microsoft account requirements. These aren’t hacks or exploits – they’re configuration options that Windows supports, just not through the graphical user interface.
What if I’m stuck in Windows S Mode and can’t open Command Prompt?
If Shift + F10 doesn’t open Command Prompt during setup, your device is likely in Windows S Mode, which restricts system access. Unfortunately, at the time of writing this guide, there isn’t a workaround for S Mode during initial setup. Your best option is to complete the setup with a Microsoft account, then switch your device out of S Mode (which is free), and finally convert your Microsoft account to a local account through Windows Settings. It’s not as convenient, but it gets you to the same end result of using a local account.

